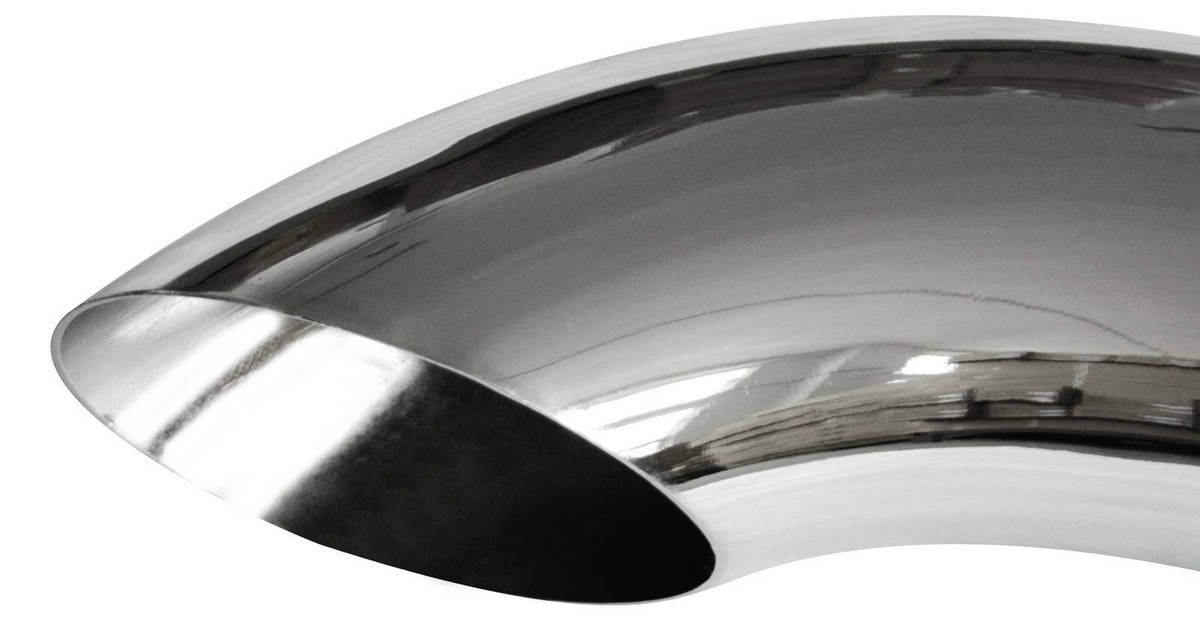
Danger Ranger… What Now? Sheesh.

So, SELL THE RANGER ALREADY, WOULDYA?

My dad’s Tundra was still sitting in Thomasville, so to make that process work out, I would need to sell the Ranger in Thomasville, to be able to drive the Tundra back home.

Coming home from the grocery store one night, I pulled into my parking space on the hillside and heard a big clunk in the rear end. I put the truck back in gear and moved it forward and back, to make sure I hadn’t locked up the rear end or something. Everything worked fine, no noise, cool.

Mental note: Check that out in the daylight and see what’s up.

Leaving the house once a week has its down-sides. Such as forgetting mental notes.

Next time I drove the truck, I heard another little clunk back there as I got out out on the road. I finished my round trip and as I pulled back into the parking space on the hillside, another big clunk. It was daylight this time, so I didn’t need to warn future me again about the inherent danger.

Climbing under the truck, my worst fears were realized. Both rear leaf spring mounts were rusted through and broken. The entire box in the spare tire area is terribly rusted, but I thought the actual frame rails were fine. Just scaly.

Newp.

Cool, cool, cool. OK. So, yeah… What am I going to do with this beautiful, valuable machine now that I don’t need it and it needs major work to be able to get any money out of it?

I’m already in it wayyyy over its actual value, having bought it at pandemic pricing from a dealership. The way over book value sales price I was asking before was going to net me a few thousand dollars loss. Now, I’m probably down over ten grand if I were to sell it in its current state.

I ended up having a friend drive me to Thomasville to pick up the Tundra. For the time being, the Ranger is yard art.

SAD.

Danger Ranger Fuel Filler Problems

My dad passed away last year and I inherited his truck, since it was otherwise going to sit unused.

I hesitantly got my Ranger cleaned up and ready to sell. I had shopped around for a long time looking for that specific model – 2000 with 5 speed, 4×4, and a 4.0 liter engine. Very low miles for the age and basically everything was original. I had intended to keep it around as my daily driver and as another project vehicle – as if Tallulah Beetlebug doesn’t have my TO DO list and bank account sweating hard enough…

I posted pics in Ranger For Sale Or Rent, so that I would be able to easily access them when posting on Craigs List and Marketplace.

When I listed it for sale, I was asking a lot for it, way over the KBB book value, because honestly, find another one like this for that published price. I had a ton of interest, people from up to three states away wanting to come look at it. One person actually did make it over and took it for a spin. When they got back, they thanked me and quickly left.

That evening, as I was fueling up for the trip home, I noticed fuel pouring out on the ground under the truck. When I got up under there to look, the metal fuel filler neck, which was VERY rusty, was broken, like someone was doing chin-ups with it. Fair enough, you found a fault. Thanks for mentioning that and not just running off.

So, I was able to trickle enough fuel into it to get the half tank necessary to get me home, back up the mountain. Took about 20 minutes to add 1/4 tank. That was definitely the most expensive 1/4 tank of gas I have purchased, since about 900% of it went on the ground.

I ordered a new filler neck online and purchased hoses at the local parts store.

The next weekend, I headed back to Thomasville and spent a few hours trying to drop the tank and replace the filler neck. The year before, I had a rusted brake hard line blow out and replaced it, but wasn’t able to drop the tank at that time to be able to properly tuck the new line up into the frame rail. It was wrapped in rubber hose the length of the truck, to make sure it didn’t rub against things and break the new line.

Anyway, I got the tank straps disconnected, but for whatever reason, was not able to get the tank to drop more than three or four inches. That gave me enough room to (very uncomfortably) replace the filler neck and hoses. I was still mostly working blind throughout the process, as that three or four inches was just enough to get my hands up in there, but not to be able to see anything.

I was blindly snapping pictures with my phone and then trying to get the lay of the land.

Wow, it’s more rusty under here than I remember.

Anyway, I got it changed. I may have hurt my back, my neck, my shoulder, and scraped every knuckle, but now there are shiny new parts. I took it to the gas station and it still had a leak.

[sighs]

Significantly improved, but still a leak. Maybe 10% lost now if going full blast at the pump.

So, it must be the weak hose clamps or jubilee clips or whatever you want to call them. I started shopping around and found some serious hardware at Tractor Supply.

So, yeah. Time to install the new clips.

Thanks, hillside. Tell mom’s carport I miss it.

Heading back to the gas station, it still drips, but now a much more live-withable 1% loss at full blast. Nothing dripping if you back off the pressure a little.

I think it’s just going to need the tank dropped to be able to get anything better out of it.

Wiper Arms and Tension Headaches – Part 2

In the ongoing saga of the limp-wristed wiper arm, I doubled up the last springs I bought, hoping that doubling the tension would improve things.

But, of course, it doesn’t work like that. Results were the same or worse.

I headed back out to the hardware store and bought the only other springs that looked like they could work.

I haven’t installed them yet, but I’m not optimistic.

Replacing the Rear Brake Drums

A couple of months ago, I purchased new brake drums all around. More than one of the existing drums are out of round and the front right tends to grab the pad at really unexpected times, trying to pull the car off the road.

After jacking up the rear driver side wheel, I pulled the old brake drum off.

Things are dry, which is good, but a little rusty.

After hosing everything down with brake parts cleaner and wiping down the new brake drum, I realized I had grabbed one of the new front brake drums. The part pictured above, 365-74004 is the rear drum.

These star adjuster wheels were both frozen/stuck. I spent a long time trying to get them freed up, spraying PB Blaster several times, before giving up. Finally, I just took the bottom spring off and was then able to pull the bottom ears of the brake shoes out of the adjuster ends. Then I used a large flat screwdriver to turn the adjuster bolts manually.

Eventually, I got a nice, snug fit of the new drum over the shoes and buttoned it all back up. I forgot to take a picture before I got the wheel back on.

You can kind of see a bit of it in there. It’s painted black and surprisingly, the brake parts cleaner didn’t seem to wipe the paint off, so that’s good.

Apparently, I gave up on documenting the process completely at this point, as the only other picture I took was once I finished up and was packing things away.

Unfortunately, I found that the passenger side rear drum was wet inside – black. Goopy and black. I wondered if the new brake cylinder I replaced last year was leaking again, but it doesn’t appear to be the case. The brake fluid reservoir is still completely tip-topped up.

Is it possible that transaxle oil is traveling down the axle?

I put the parking brake on full, put the car in neutral, and wasn’t able to push it. The brakes appear to be tight. I will take the car out for a runaround later today.

Wiper Arms and Tension Headaches

When preparing my Ranger to go up for sale, I noticed the wiper arms looked really shoddy. Paint faded and chipped and surface rust. The ones on the Beetle had previously been painted but were also looking pretty shabby. I decided to take them all off, clean them up, and paint them.

The wiper arms appear to be interchangeable on the Beetle, but they are different. Likely one was just replaced from a different year. The Ranger appears to have identical left and right arms. I kept them all separated and labeled just in case.

Wiper blades off…

…and hit them with a scrap of 180 grit sandpaper I had laying around.

It smoothed the rough paint edges and left a nice scuff for the new paint to stick to.

I wiped them down with acetone to get rid of dust, dirt, and oils.

And gave them a coat of Dupli-Color Rust Barrier.

And then a couple of coats of Dupli-Color DE1634.

The wipers don’t work very well in the Beetle, like they don’t have enough tension against the window to actually clear anything. I wanted to check the springs, to see if I could cut and stretch them or find beefier replacements.

As soon as I gripped it with needle nose pliers, the rusty spring snapped. So, it was time to put the wipers back on the Ranger and go parts shopping.

Nice.

I went first to O’Reilly, figuring they would have that type of thing in the hardware aisle, but they only had bigger sizes, like throttle return springs.

There’s an Ace Hardware next door that usually has better hardware than parts stores and even big places like Lowes and Home Depot.

I found a close match here. The spring is a little smaller diameter and a little longer, so I figured I would have to do some surgery.

I didn’t take that picture specifically to post here. They didn’t have any writing implements in the hardware aisle to note the item number or price on the bag.

That’s the first time I have purchased something with cash in quite a while. I try not to stick retailers with equal amounts of credit card processing fees and purchase price.

They mounted back up without issue and look nice. They kind of disappear into the windshield trim, as it should be.

New Key, Who Dis?

After AAA and their mysterious Fletcher locksmiths wasted half of my precious weekend, I decided to reach out to a local locksmith one evening last week. He met me in a parking lot an hour later and cut the new keys for me.

There is something entirely strange going on with the driver’s side door handle, lock cylinder, or both. For whatever reason, the cylinder doesn’t turn more than half way anymore. I sprayed it down with WD-40 and worked the springs and wafers around, thinking it was just gunked up in there.

I eventually gave up and took a file to it, smoothing down the tiny rough edges of wafers that were sticking up. The old key worked perfectly in this door lock and the ignition. The new key works perfectly in the ignition, but binds up in the door lock. Who knows. I tested the new key in the passenger side door handle and it works perfectly there, so problem solved!

Swapped them over. Officially, I am back to the same key for all three slots, even if only two of them actually work.

Installing the Fire Extinguisher and Cover

After sewing a black vinyl fire extinguisher cover, it’s time to actually install the thing.

I purposefully aligned it a little off center on the tunnel, because my big ol’ gas pedal foot was hitting the extinguisher when it was centered. A couple of self tappers held it in tight.

There was another black foam pad on that center bit that I later found stuck to my hoodie. Stuck that back in place and clamped in the fire extinguisher.

And now with the vinyl cover in place.

The end caps are a little long, since the tunnel is round-ish. I cut a couple of slits in each end, hoping it would lay better.

But, meh. Again, it’s fine. I think I will probably make a new cover later. We’ll see where that eventually lands on the project priority list. It may be determined by whether the wind whips this cover around while driving with the windows down. I may see if I can Velcro the cover down at a later time.